
`
If you are looking for a creative way to enjoy your herb or tobacco, you might want to try making your own glass bong from a glass bottle. A glass bong is a device that filters and cools the smoke from burning herb or tobacco through water, making it smoother and less harsh on your lungs. Glass bongs can be expensive to buy, but you can make one yourself with some basic tools and materials.
In this blog post, we will show you how to drill a hole in a glass bottle to make a glass bong. Drilling a hole in glass can be tricky, but with the right drill bit and technique, you can do it without breaking the bottle or injuring yourself. Here are the steps you need to follow:
Step 1: Gather the materials
To make a glass bong from a glass bottle, you will need the following materials:
- A glass bottle of your choice. You can use any size or shape of bottle, but make sure it is clean and dry. You can also remove any labels or stickers from the bottle if you want.
- A power drill with a variable speed control. You will need to drill at low speed and moderate pressure to avoid cracking the glass.
- A small spear-tipped carbide or diamond drill bit. These are special drill bits that are designed to cut through glass without shattering it. You can find them at most hardware stores or online. You will need a small drill bit (either 1/8-inch or 3/32-inch) to make a starter hole, and a larger drill bit (depending on the size of the hole you want) to enlarge the hole.
- Painter’s tape or masking tape. You will use this to mark the spot where you want to drill the hole and to provide some traction for the drill bit.
- A felt-tip marker or ink pen. You will use this to draw a dot at the center of the tape where you want to drill the hole.
- A folded towel or similar soft pad. You will use this to place the bottle on while drilling to prevent it from rolling or sliding.
- Water. You will need water to cool the drill bit and the glass while drilling. You can use a spray bottle, a hose, or a faucet to provide a steady stream of water.
- Safety goggles, dust mask, and gloves. You will need these to protect your eyes, lungs, and hands from flying glass shards and dust particles.
- A metal or plastic tube. You will use this as the stem of your bong. It should be long enough to reach from the hole in the bottle to your mouth, and wide enough to fit snugly in the hole. You can use a metal pipe, a plastic straw, or any other suitable tube.
- A metal or plastic bowl. You will use this as the bowl of your bong where you will put your herb or tobacco. It should have a small hole at the bottom that fits over the end of the tube. You can use a metal nut, a bottle cap, or any other suitable bowl.
- Some glue or epoxy. You will use this to seal the gap between the tube and the hole in the bottle.
Step 2: Mark the drill site
Choose where you want to drill the hole in your bottle. It should be on the side of the bottle near the bottom, but not too close to the edge or the base. The hole should be large enough to fit your tube snugly, but not too large that it compromises the strength of the bottle.
Make an “X” with two pieces of painter’s tape or masking tape at the drill site. Smooth both strips with your finger so that they are lying flat on the glass. The tape will help you keep track of where your hole needs to go and provide some traction for
the drill bit.
Take your felt-tip marker or ink pen and draw a dot at the center of
the “X”. This dot will serve as a guide for your drill bit.
Step 3: Secure the bottle for drilling
Place your folded towel or soft pad on a flat work surface that is around waist- or chest-high. Lay your bottle flat on the pad with
the taped side facing up.
Make sure your bottle is stable and does not roll or slide on
the pad. You can use some clamps, rubber bands, or duct tape to secure the bottle if needed.
Warning: Do not attempt to drill the bottle while it is resting directly on a hard surface, as this could cause it to break or move.
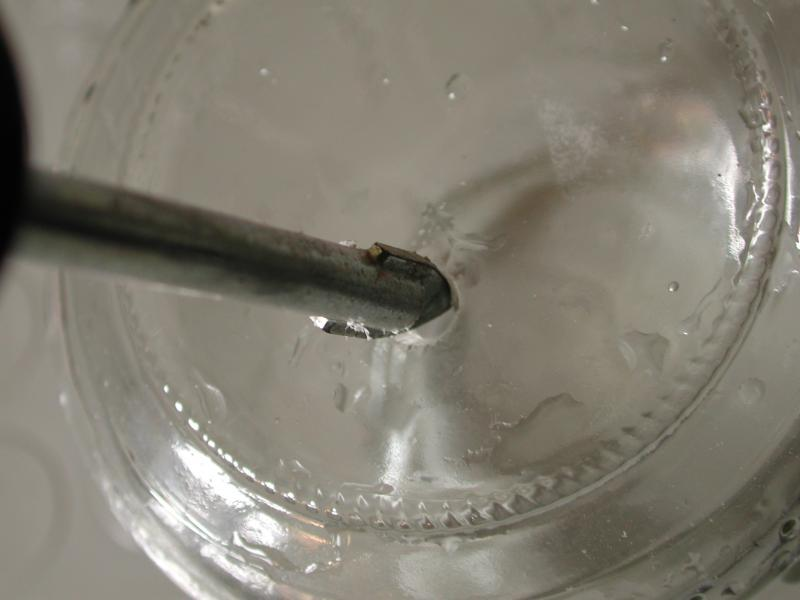
Step 4: Drill the hole
Put on your safety goggles, dust mask, and gloves. Fit your power drill with the small spear-tipped carbide or diamond drill bit. You will use this bit to make a starter hole, which you will then enlarge with the larger bit.
Align the tip of the drill bit with the dot on the tape and hold the drill so that it forms a right angle with the surface of the glass. Start drilling at a 45-degree angle and then gradually become perpendicular to the bottle. This will help you avoid slipping or chipping the glass.
Squeeze the trigger of the drill lightly and apply moderate pressure to the bit. Keep your drill speed below 400 rpm. If you drill too fast, you will generate too much heat and damage your drill bit and the glass.
Use water to cool the drill bit and the glass while drilling. You can use a spray bottle, a hose, or a faucet to provide a steady stream of water. The water will also help to flush out the glass dust and prevent clogging.
Drill slowly and carefully until you break through the glass. Do not push too hard or too fast, as this could cause the glass to crack or shatter. Reduce your speed and pressure as you approach the end of the drilling to avoid chipping.
Once you have made a starter hole, switch to the larger drill bit that matches the size of your tube. Repeat the same steps as above to enlarge the hole. Make sure you keep using water to cool the drill bit and the glass.
Step 5: Smooth and cover the hole
Remove the tape from the bottle and inspect the hole. It should be smooth and even, without any cracks or chips. If there are any rough edges or sharp points, you can use a 600-grit diamond file to smooth them out.
Dry the bottle and the hole thoroughly with a cloth or paper towel. Insert your tube into the hole and check for any gaps or leaks. If there are any, you can use some glue or epoxy to seal them. Apply a thin layer of glue or epoxy around
the edge of the hole and around the tube where it meets
the glass. Let it dry completely before using your bong.
Step 6: Attach the bowl
Take your metal or plastic bowl and make sure it has a small hole at
the bottom that fits over the end of your tube. You can use a nail or a screwdriver to make or enlarge the hole if needed.
Place your bowl over the end of your tube and secure it with some glue or epoxy. Apply a thin layer of glue or epoxy around
the edge of the bowl and around
the tube where it meets
the bowl. Let it dry completely before using your bong.
Step 7: Fill your bong with water
Your glass bong is almost ready to use. All you need to do is fill it with water. The water will filter and cool
the smoke from your herb or tobacco, making it smoother and less harsh on your lungs.
To fill your bong with water, remove
the bowl from
the tube and pour some water into
the bottle through
the opening at
the top. Fill
the bottle until
the water level is about an inch above
the bottom of
the tube. Do not overfill
the bottle, as this could cause water to splash into
your mouth when you inhale.
Replace
the bowl on
the tube and check for any leaks. If there are any, you can use some more glue or epoxy to seal them.
Step 8: Enjoy your bong
Your glass bong is ready to use. To use it, follow these steps:
- Grind some herb or tobacco and pack it into
your bowl. Do not pack it too tightly, as this could restrict airflow. - Hold your bong by
the neck with one hand and place your mouth over
the opening at
the top. - Light your herb or tobacco with a lighter or a match and inhale slowly through
your mouth. As you inhale, you will see smoke bubbling through
the water in
the bottle. - When you have filled
your lungs with smoke, remove
your mouth from
the bong and exhale. - Repeat


